> ## Documentation Index
> Fetch the complete documentation index at: https://cometchat-22654f5b-feature-react-native-sdk-quotedmessage-a.mintlify.site/llms.txt
> Use this file to discover all available pages before exploring further.
# Getting Started With UI Kit Builder
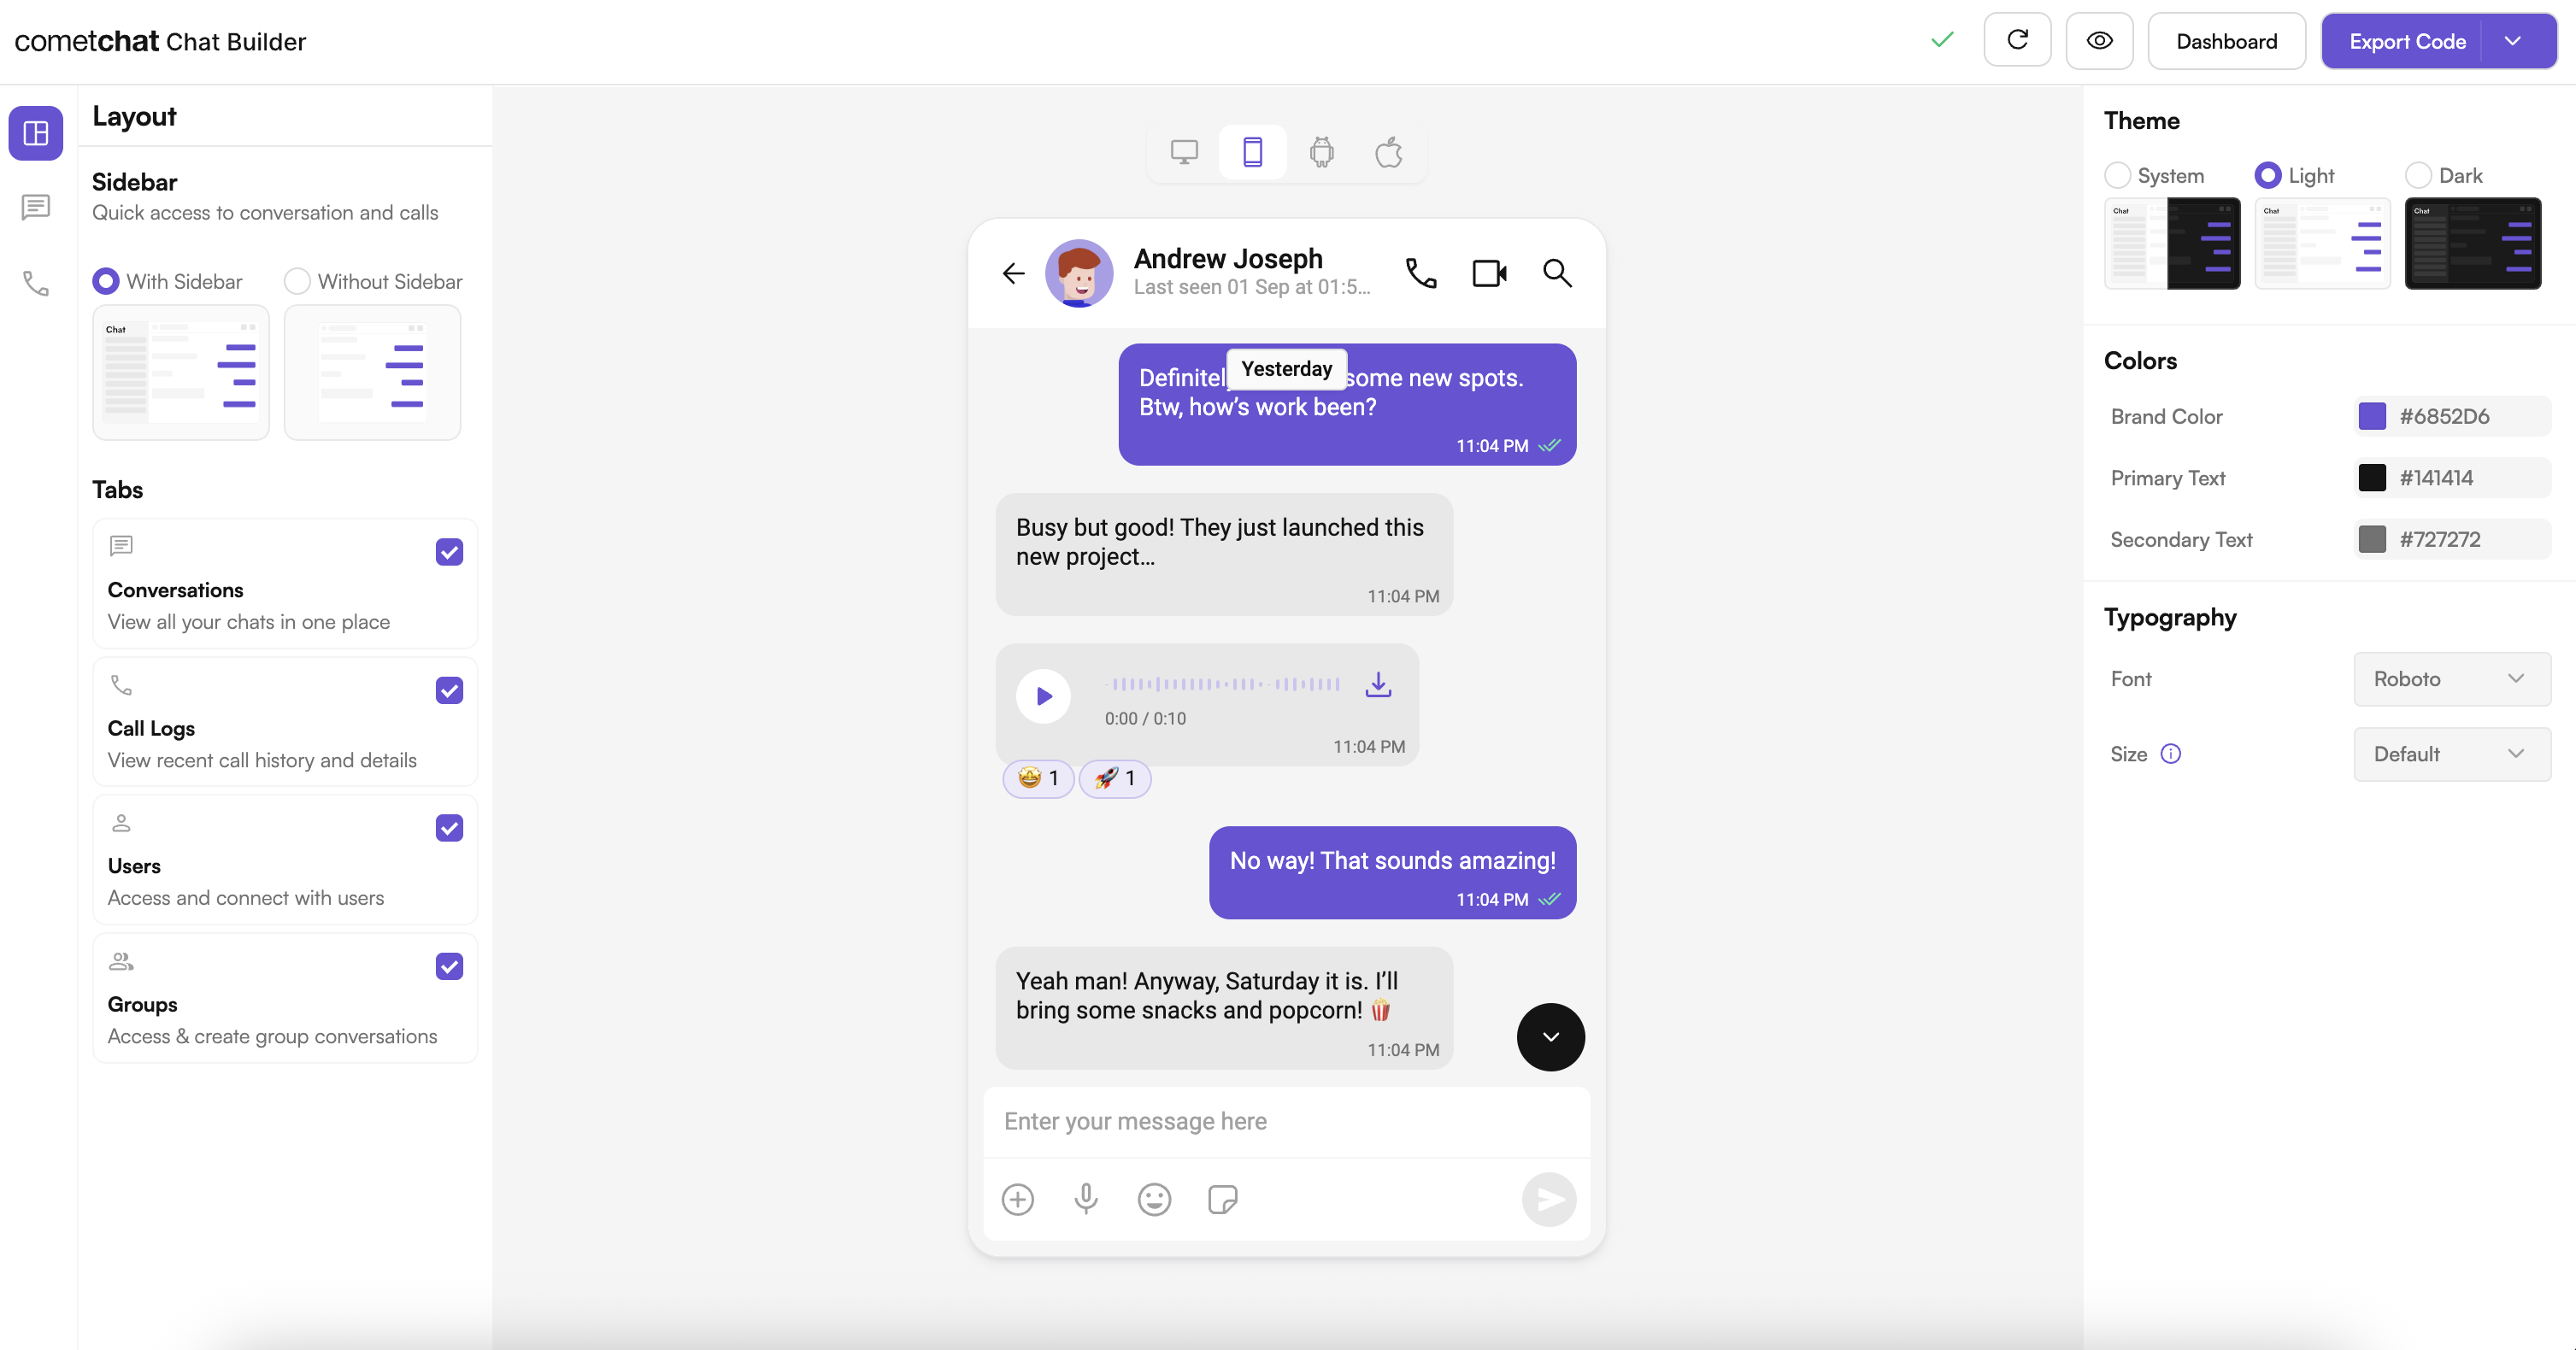
UI Kit Builder streamlines integrating CometChat’s Flutter UI Kit into your cross-platform app. Design the experience visually, export platform-ready assets, and connect them to your Flutter project with just a few steps.
 ## Complete Integration Workflow
1. Design your chat experience in UI Kit Builder.
2. Export your Flutter package with configuration JSON, assets, and helper files.
3. Enable advanced features in the CometChat Dashboard if your experience requires them.
4. Optionally explore the sample module to preview the UI Kit Builder experience.
5. Integrate the UI Kit Builder module into your Flutter project.
6. Customize the UI further with the Flutter UI Kit components and styling APIs.
***
## Launch the UI Kit Builder
1. Log in to your CometChat Dashboard: [https://app.cometchat.com](https://app.cometchat.com)
2. Select your application.
3. Go to Integrate → Flutter → Launch UI Kit Builder.
***
## Enable Features in CometChat Dashboard
If your app needs any of these, enable them from your Dashboard: [https://app.cometchat.com](https://app.cometchat.com)
* Stickers
* Polls
* Collaborative whiteboard
* Collaborative document
* Message translation
* AI User Copilot: Conversation starter, Conversation summary, Smart reply
How to enable:
## Complete Integration Workflow
1. Design your chat experience in UI Kit Builder.
2. Export your Flutter package with configuration JSON, assets, and helper files.
3. Enable advanced features in the CometChat Dashboard if your experience requires them.
4. Optionally explore the sample module to preview the UI Kit Builder experience.
5. Integrate the UI Kit Builder module into your Flutter project.
6. Customize the UI further with the Flutter UI Kit components and styling APIs.
***
## Launch the UI Kit Builder
1. Log in to your CometChat Dashboard: [https://app.cometchat.com](https://app.cometchat.com)
2. Select your application.
3. Go to Integrate → Flutter → Launch UI Kit Builder.
***
## Enable Features in CometChat Dashboard
If your app needs any of these, enable them from your Dashboard: [https://app.cometchat.com](https://app.cometchat.com)
* Stickers
* Polls
* Collaborative whiteboard
* Collaborative document
* Message translation
* AI User Copilot: Conversation starter, Conversation summary, Smart reply
How to enable:
 1. Log in to the Dashboard.
2. Select your app.
3. Navigate to Chat → Features.
4. Toggle ON the required features and Save.
***
## Integration with CometChat UI Kit Builder
Follow these steps to wire the Builder output into your existing Flutter app.
### Step 1: Download the Builder package
From the Dashboard export, download the Flutter Builder bundle. Inside you will find a `chat_builder` module, assets, and helper utilities.
### Step 2: Add the Builder module to your project
Copy the `chat_builder` directory into the root of your Flutter project (for example, next to your `lib`, `ios`, and `android` folders).
### Step 3: Copy Builder assets
Move the contents of `chat_builder/assets/` into your app’s `assets/` directory. Keep the folder structure intact so fonts, JSON files, and images resolve correctly.
### Step 4: Update `pubspec.yaml`
Point to the local Builder module and register the assets and fonts supplied by the export:
```yaml theme={null}
dependencies:
# other dependencies
chat_builder:
path: ./chat_builder
flutter:
uses-material-design: true
assets:
- assets/
- assets/sample_app/
fonts:
- family: arial
fonts:
- asset: assets/fonts/arial_regular.ttf
- asset: assets/fonts/arial_medium.ttf
- asset: assets/fonts/arial_bold.ttf
- family: inter
fonts:
- asset: assets/fonts/inter_regular.otf
- asset: assets/fonts/inter_medium.otf
- asset: assets/fonts/inter_bold.otf
- family: roboto
fonts:
- asset: assets/fonts/roboto_regular.ttf
- asset: assets/fonts/roboto_medium.ttf
- asset: assets/fonts/roboto_bold.ttf
- family: times New Roman
fonts:
- asset: assets/fonts/times_new_roman_regular.ttf
- asset: assets/fonts/times_new_roman_medium.otf
- asset: assets/fonts/times_new_roman_bold.otf
```
Ensure indentation is consistent—Flutter’s asset and font declarations are whitespace sensitive.
### Step 5: Install dependencies
Run the following commands at the root of your project:
```bash theme={null}
flutter pub get
cd ios && pod install
```
If your project uses scripting for iOS installs, adapt the second command accordingly.
### Step 6: Initialize Builder settings before `runApp`
Import the helper from the Builder module and load settings during app startup:
```dart theme={null}
import 'package:flutter/widgets.dart';
import 'package:chat_builder/utils/builder_settings_helper.dart';
Future main() async {
WidgetsFlutterBinding.ensureInitialized();
await BuilderSettingsHelper.loadFromAsset();
runApp(const MyApp());
}
```
This ensures generated constants, themes, and resources are ready when your widgets build.
### Step 7: Launch UI Kit Builder screens as needed
Use the `ChatBuilder` APIs to open preconfigured experiences.
* If CometChat is **not initialized** or the user is **not logged in**:
```dart theme={null}
import 'package:chat_builder/chat_builder.dart';
ChatBuilder.launchBuilder(context);
```
* If CometChat is initialized and the user is logged in:
```dart theme={null}
ChatBuilder.launchMessages(
context: context,
user: user, // instance of CometChatUser
);
ChatBuilder.launchMessages(
context: context,
group: group, // instance of CometChatGroup
);
```
### Step 8: Refresh settings after configuration updates
Whenever you export a new Builder configuration, replace the generated JSON, fonts, and assets in your project, then rerun `flutter pub get` to pick up changes.
***
## Available Builder Settings Categories
* Core Messaging Experience — typing indicators, attachments, media, polls.
* Deeper User Engagement — reactions, message translation, stickers, extensions.
* AI User Copilot — smart replies, conversation starters, summaries.
* Group Management — creation, roles, member controls.
* Moderator Controls — kick, ban, mute, report workflows.
* Voice & Video Calling — one-to-one and group calling toggles.
* Layout & Styling — colors, fonts, corner radii, spacing.
***
## Benefits of Using CometChat UI Kit Builder
* Easy configuration: Update experiences without touching Flutter code.
* Type-safe constants: Generated Dart helpers keep settings discoverable.
* Consistent styling: Centralized theming across modules.
* Feature toggling: Enable or disable capabilities dynamically.
* Faster iteration: Designers and developers stay aligned via visual config.
***
## Alternative: Import the CometChatBuilder Sample App as a Module
Prefer a plug-and-play starting point? Import the preconfigured sample module to explore the experience before wiring it into production.
1. Download the sample from the CometChat Dashboard.
2. Open the sample in your IDE and run `flutter pub get` followed by `flutter run` to preview the flows.
3. When ready, add the sample module to your workspace and reference it from your main app via `path` dependencies.
4. Gradually migrate screens or copy utilities (like `BuilderSettingsHelper`) into your production package.
***
## Run the App
After integrating the module, run your Flutter project on an emulator or device:
```bash theme={null}
flutter run
```
Ensure a CometChat user is created and logged in via your authentication flow before launching message screens.
***
## Additional Notes
* Keep the Builder assets in sync with the latest export whenever you change configuration in the dashboard.
* Fonts supplied by the Builder can be swapped for your brand fonts—update the font family definitions in `pubspec.yaml`.
* For macOS or web targets, guard Builder-specific code with platform checks until those exports are supported.
***
## Troubleshooting
* Builder package not found: Confirm the `chat_builder` directory path in `pubspec.yaml` is correct.
* Assets missing at runtime: Verify the asset paths in `pubspec.yaml` and rerun `flutter pub get`.
* iOS build issues: Make sure you ran `pod install` inside the `ios` directory after adding the new dependency.
* Undefined symbols: Reimport or regenerate the `BuilderSettingsHelper` if package paths changed.
***
## Next Steps
* Customize theming with the Flutter UI Kit: [Theme introduction](/ui-kit/flutter/theme-introduction)
* Explore available components: [Components overview](/ui-kit/flutter/components-overview)
* Dig into API usage: [Methods & APIs](/ui-kit/flutter/methods)
1. Log in to the Dashboard.
2. Select your app.
3. Navigate to Chat → Features.
4. Toggle ON the required features and Save.
***
## Integration with CometChat UI Kit Builder
Follow these steps to wire the Builder output into your existing Flutter app.
### Step 1: Download the Builder package
From the Dashboard export, download the Flutter Builder bundle. Inside you will find a `chat_builder` module, assets, and helper utilities.
### Step 2: Add the Builder module to your project
Copy the `chat_builder` directory into the root of your Flutter project (for example, next to your `lib`, `ios`, and `android` folders).
### Step 3: Copy Builder assets
Move the contents of `chat_builder/assets/` into your app’s `assets/` directory. Keep the folder structure intact so fonts, JSON files, and images resolve correctly.
### Step 4: Update `pubspec.yaml`
Point to the local Builder module and register the assets and fonts supplied by the export:
```yaml theme={null}
dependencies:
# other dependencies
chat_builder:
path: ./chat_builder
flutter:
uses-material-design: true
assets:
- assets/
- assets/sample_app/
fonts:
- family: arial
fonts:
- asset: assets/fonts/arial_regular.ttf
- asset: assets/fonts/arial_medium.ttf
- asset: assets/fonts/arial_bold.ttf
- family: inter
fonts:
- asset: assets/fonts/inter_regular.otf
- asset: assets/fonts/inter_medium.otf
- asset: assets/fonts/inter_bold.otf
- family: roboto
fonts:
- asset: assets/fonts/roboto_regular.ttf
- asset: assets/fonts/roboto_medium.ttf
- asset: assets/fonts/roboto_bold.ttf
- family: times New Roman
fonts:
- asset: assets/fonts/times_new_roman_regular.ttf
- asset: assets/fonts/times_new_roman_medium.otf
- asset: assets/fonts/times_new_roman_bold.otf
```
Ensure indentation is consistent—Flutter’s asset and font declarations are whitespace sensitive.
### Step 5: Install dependencies
Run the following commands at the root of your project:
```bash theme={null}
flutter pub get
cd ios && pod install
```
If your project uses scripting for iOS installs, adapt the second command accordingly.
### Step 6: Initialize Builder settings before `runApp`
Import the helper from the Builder module and load settings during app startup:
```dart theme={null}
import 'package:flutter/widgets.dart';
import 'package:chat_builder/utils/builder_settings_helper.dart';
Future main() async {
WidgetsFlutterBinding.ensureInitialized();
await BuilderSettingsHelper.loadFromAsset();
runApp(const MyApp());
}
```
This ensures generated constants, themes, and resources are ready when your widgets build.
### Step 7: Launch UI Kit Builder screens as needed
Use the `ChatBuilder` APIs to open preconfigured experiences.
* If CometChat is **not initialized** or the user is **not logged in**:
```dart theme={null}
import 'package:chat_builder/chat_builder.dart';
ChatBuilder.launchBuilder(context);
```
* If CometChat is initialized and the user is logged in:
```dart theme={null}
ChatBuilder.launchMessages(
context: context,
user: user, // instance of CometChatUser
);
ChatBuilder.launchMessages(
context: context,
group: group, // instance of CometChatGroup
);
```
### Step 8: Refresh settings after configuration updates
Whenever you export a new Builder configuration, replace the generated JSON, fonts, and assets in your project, then rerun `flutter pub get` to pick up changes.
***
## Available Builder Settings Categories
* Core Messaging Experience — typing indicators, attachments, media, polls.
* Deeper User Engagement — reactions, message translation, stickers, extensions.
* AI User Copilot — smart replies, conversation starters, summaries.
* Group Management — creation, roles, member controls.
* Moderator Controls — kick, ban, mute, report workflows.
* Voice & Video Calling — one-to-one and group calling toggles.
* Layout & Styling — colors, fonts, corner radii, spacing.
***
## Benefits of Using CometChat UI Kit Builder
* Easy configuration: Update experiences without touching Flutter code.
* Type-safe constants: Generated Dart helpers keep settings discoverable.
* Consistent styling: Centralized theming across modules.
* Feature toggling: Enable or disable capabilities dynamically.
* Faster iteration: Designers and developers stay aligned via visual config.
***
## Alternative: Import the CometChatBuilder Sample App as a Module
Prefer a plug-and-play starting point? Import the preconfigured sample module to explore the experience before wiring it into production.
1. Download the sample from the CometChat Dashboard.
2. Open the sample in your IDE and run `flutter pub get` followed by `flutter run` to preview the flows.
3. When ready, add the sample module to your workspace and reference it from your main app via `path` dependencies.
4. Gradually migrate screens or copy utilities (like `BuilderSettingsHelper`) into your production package.
***
## Run the App
After integrating the module, run your Flutter project on an emulator or device:
```bash theme={null}
flutter run
```
Ensure a CometChat user is created and logged in via your authentication flow before launching message screens.
***
## Additional Notes
* Keep the Builder assets in sync with the latest export whenever you change configuration in the dashboard.
* Fonts supplied by the Builder can be swapped for your brand fonts—update the font family definitions in `pubspec.yaml`.
* For macOS or web targets, guard Builder-specific code with platform checks until those exports are supported.
***
## Troubleshooting
* Builder package not found: Confirm the `chat_builder` directory path in `pubspec.yaml` is correct.
* Assets missing at runtime: Verify the asset paths in `pubspec.yaml` and rerun `flutter pub get`.
* iOS build issues: Make sure you ran `pod install` inside the `ios` directory after adding the new dependency.
* Undefined symbols: Reimport or regenerate the `BuilderSettingsHelper` if package paths changed.
***
## Next Steps
* Customize theming with the Flutter UI Kit: [Theme introduction](/ui-kit/flutter/theme-introduction)
* Explore available components: [Components overview](/ui-kit/flutter/components-overview)
* Dig into API usage: [Methods & APIs](/ui-kit/flutter/methods)