(
undefined
);
const [selectedGroup, setSelectedGroup] = useState<
CometChat.Group | undefined
>(undefined);
useEffect(() => {
const UIKitSettings = new UIKitSettingsBuilder()
.setAppId(COMETCHAT_CONSTANTS.APP_ID)
.setRegion(COMETCHAT_CONSTANTS.REGION)
.setAuthKey(COMETCHAT_CONSTANTS.AUTH_KEY)
.subscribePresenceForAllUsers()
.build();
// Initialize CometChat UIKit
CometChatUIKit.init(UIKitSettings)
?.then(() => {
setupLocalization();
console.log("Initialization completed successfully");
CometChatUIKit.getLoggedinUser().then((loggedInUser) => {
if (!loggedInUser) {
CometChatUIKit.login("cometchat-uid-1") // Replace with your logged in user UID
.then((user) => {
console.log("Login Successful", { user });
setUser(user);
})
.catch((error) => console.error("Login failed", error));
} else {
console.log("Already logged-in", { loggedInUser });
setUser(loggedInUser);
}
});
})
.catch((error) => console.error("Initialization failed", error));
}, []);
useEffect(() => {
if (user) {
// Fetch user or group from CometChat SDK whose chat you want to load.
/** Fetching User */
const UID = "cometchat-uid-2"; // Replace with your actual UID
CometChat.getUser(UID).then(
(user) => {
setSelectedUser(user);
},
(error) => {
console.log("User fetching failed with error:", error);
}
);
/** Fetching Group */
// const GUID = "cometchat-guid-1"; // Replace with your actual GUID
// CometChat.getGroup(GUID).then(
// (group) => {
// setSelectedGroup(group);
// },
// (error) => {
// console.log("User fetching failed with error:", error);
// }
// );
}
}, [user]);
return (
/* The CometChatApp component requires a parent element with an explicit height and width
to render properly. Ensure the container has defined dimensions, and adjust them as needed
based on your layout requirements. */
{(selectedUser || selectedGroup) && (
)}
);
};
export default CometChatNoSSR;
```
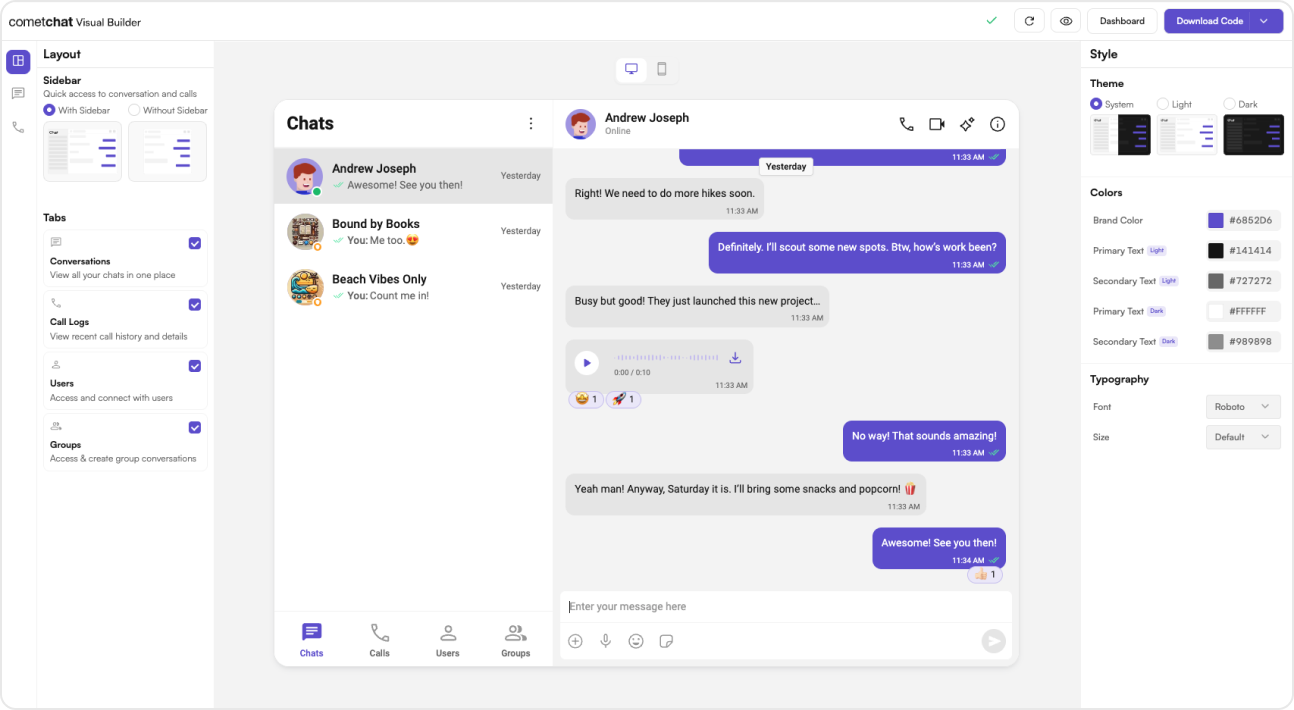
When you enable the **Without Sidebar** option for the Sidebar, the following behavior applies:
* **User Chats (`chatType = "user"`)**: Displays one-on-one chats only, either for a currently selected user or the default user.
* **Group Chats (`chatType = "group"`)**: Displays group chats exclusively, either for a currently selected group or the default group.
**Group Action Messages**
You can control the visibility of group action messages using the showGroupActionMessages prop:
```
```
* If `showGroupActionMessages` is `true (default)`, group action messages will be **visible**.
* If `showGroupActionMessages` is `false`, group action messages will be **hidden**.
***
### **Step 6: Run Your App**
Start your development server:
```
npm run dev
```
***
## **Additional Configuration Notes**
Ensure the following features are also turned on in your app > Chat > Features for full functionality:
* Message translation
* Polls
* Stickers
* Collaborative whiteboard
* Collaborative document
* Conversation starter
* Conversation summary
* Smart reply
If you face any issues while integrating the builder in your app project, please check if you have the following configurations added to your `tsConfig.json`:
```json theme={null}
{
"compilerOptions": {
"jsx": "react-jsx",
"resolveJsonModule": true
}
}
```
If your development server is running, restart it to ensure the new TypeScript configuration is picked up.
***
## **Understanding Your Generated Code**
The exported package includes several important elements to help you further customize your chat experience:
### **Directory Structure**
The `CometChat` folder contains:
* **Components** - Individual UI elements (message bubbles, input fields, etc.)
* **Layouts** - Pre-configured arrangement of components
* **Context** - State management for your chat application
* **Hooks** - Custom React hooks for chat functionality
* **Utils** - Helper functions and configuration
### **Configuration Files**
* **CometChat Settings File** - Controls the appearance and behavior of your chat UI
* **Theme Configuration** - Customize colors, typography, and spacing
* **Localization Files** - Add support for different languages
***
## **Next Steps**
Now that you've set up your **chat experience**, explore further configuration options:
* **[Builder Configuration File](/ui-kit/react/builder-settings)** – Learn how to customize your integration.
* **[Builder Directory Structure](/ui-kit/react/builder-dir-structure)** – Understand the organization of the builder components.
* **[Advanced Theming](/ui-kit/react/theme)** – Modify themes and UI elements to match your brand.
* **[Additional Customizations](/ui-kit/react/builder-customisations)** – Customise the UI the way you want.
***
 ## **Complete Integration Workflow**
1. **Design Your Chat Experience** - Use the **UI Kit Builder** to customize layouts, features, and styling.
2. **Export Your Code** - Once satisfied, download the generated code package.
3. **Enable Features** - Enable additional features in the CometChat Dashboard if required.
4. **Preview Customizations** - Optionally, preview the chat experience before integrating it into your project.
5. **Integration** - Integrate into your existing application.
6. **Customize Further** - Explore advanced customization options to tailor the chat experience.
***
## **Launch the UI Kit Builder**
1. Log in to your [**CometChat Dashboard**](https://app.cometchat.com).
2. Select your application from the list.
3. Navigate to **Integrate** > **React** > **Launch UI Kit Builder**.
***
## **Enable Features in CometChat Dashboard**
If your app requires any of the following features, make sure to enable them from the **[CometChat Dashboard](https://app.cometchat.com/)**
* **Stickers** – Allow users to send expressive stickers.
* **Polls** – Enable in-chat polls for user engagement.
* **Collaborative Whiteboard** – Let users draw and collaborate in real time.
* **Collaborative Document** – Allow multiple users to edit documents together.
* **Message Translation** – Translate messages between different languages.
* **AI User Copilot**
* Conversation Starter – Suggests conversation openers.
* Conversation Summary – Generates AI-powered chat summaries.
* Smart Reply – Provides quick reply suggestions.
### **How to Enable These Features?**
## **Complete Integration Workflow**
1. **Design Your Chat Experience** - Use the **UI Kit Builder** to customize layouts, features, and styling.
2. **Export Your Code** - Once satisfied, download the generated code package.
3. **Enable Features** - Enable additional features in the CometChat Dashboard if required.
4. **Preview Customizations** - Optionally, preview the chat experience before integrating it into your project.
5. **Integration** - Integrate into your existing application.
6. **Customize Further** - Explore advanced customization options to tailor the chat experience.
***
## **Launch the UI Kit Builder**
1. Log in to your [**CometChat Dashboard**](https://app.cometchat.com).
2. Select your application from the list.
3. Navigate to **Integrate** > **React** > **Launch UI Kit Builder**.
***
## **Enable Features in CometChat Dashboard**
If your app requires any of the following features, make sure to enable them from the **[CometChat Dashboard](https://app.cometchat.com/)**
* **Stickers** – Allow users to send expressive stickers.
* **Polls** – Enable in-chat polls for user engagement.
* **Collaborative Whiteboard** – Let users draw and collaborate in real time.
* **Collaborative Document** – Allow multiple users to edit documents together.
* **Message Translation** – Translate messages between different languages.
* **AI User Copilot**
* Conversation Starter – Suggests conversation openers.
* Conversation Summary – Generates AI-powered chat summaries.
* Smart Reply – Provides quick reply suggestions.
### **How to Enable These Features?**
 1. Log in to your **[CometChat Dashboard](https://app.cometchat.com)**
2. Select your application.
3. Navigate to **Chat > Features**.
4. Toggle **ON** the required features.
5. Click **Save Changes**.
***
## **Preview Customizations (Optional)**
Before integrating the **UI Kit Builder** into your project, you can preview the chat experience by following these steps. This step is completely optional and can be skipped if you want to directly integrate the **UI Kit Builder** into your project.
> You can preview the experience:
>
> 1. Open the `cometchat-app-react` folder.
> 2. Add credentials for your app in `src/index.tsx`:
>
> ```javascript theme={null}
> export const COMETCHAT_CONSTANTS = {
> APP_ID: "", // Replace with your App ID
> REGION: "", // Replace with your App Region
> AUTH_KEY: "", // Replace with your Auth Key or leave blank if you are authenticating using Auth Token
> };
> ```
>
> 3. Install dependencies:
>
> ```
> npm i
> ```
>
> 4. Run the app:
>
> ```powershell theme={null}
> npm start
> ```
***
## **Integration with CometChat UI Kit Builder (Next.js)**
### **Step 1: Install Dependencies**
```ruby theme={null}
npm install @cometchat/chat-uikit-react@6.2.3 @cometchat/calls-sdk-javascript
```
### **Step 2: Copy CometChat Folder**
Copy the `cometchat-app-react/src/CometChat` folder inside your `src/app` directory.
***
### **Step 3: Create & Initialize `CometChatNoSSR.tsx`**
Directory Structure:
```swift theme={null}
src/app/
├── CometChat/
└── CometChatNoSSR/
└── CometChatNoSSR.tsx
```
src/app/CometChatNoSSR/CometChatNoSSR.tsx
```javascript theme={null}
import React, { useEffect } from "react";
import {
CometChatUIKit,
UIKitSettingsBuilder,
} from "@cometchat/chat-uikit-react";
import CometChatApp from "../CometChat/CometChatApp";
import { CometChatProvider } from "../CometChat/context/CometChatContext";
import { setupLocalization } from "../CometChat/utils/utils";
export const COMETCHAT_CONSTANTS = {
APP_ID: "", // Replace with your App ID
REGION: "", // Replace with your App Region
AUTH_KEY: "", // Replace with your Auth Key or leave blank if you are authenticating using Auth Token
};
const CometChatNoSSR: React.FC = () => {
useEffect(() => {
const UIKitSettings = new UIKitSettingsBuilder()
.setAppId(COMETCHAT_CONSTANTS.APP_ID)
.setRegion(COMETCHAT_CONSTANTS.REGION)
.setAuthKey(COMETCHAT_CONSTANTS.AUTH_KEY)
.subscribePresenceForAllUsers()
.build();
CometChatUIKit.init(UIKitSettings)
?.then(() => {
setupLocalization();
console.log("Initialization completed successfully");
})
.catch((error) => console.error("Initialization failed", error));
}, []);
return (
1. Log in to your **[CometChat Dashboard](https://app.cometchat.com)**
2. Select your application.
3. Navigate to **Chat > Features**.
4. Toggle **ON** the required features.
5. Click **Save Changes**.
***
## **Preview Customizations (Optional)**
Before integrating the **UI Kit Builder** into your project, you can preview the chat experience by following these steps. This step is completely optional and can be skipped if you want to directly integrate the **UI Kit Builder** into your project.
> You can preview the experience:
>
> 1. Open the `cometchat-app-react` folder.
> 2. Add credentials for your app in `src/index.tsx`:
>
> ```javascript theme={null}
> export const COMETCHAT_CONSTANTS = {
> APP_ID: "", // Replace with your App ID
> REGION: "", // Replace with your App Region
> AUTH_KEY: "", // Replace with your Auth Key or leave blank if you are authenticating using Auth Token
> };
> ```
>
> 3. Install dependencies:
>
> ```
> npm i
> ```
>
> 4. Run the app:
>
> ```powershell theme={null}
> npm start
> ```
***
## **Integration with CometChat UI Kit Builder (Next.js)**
### **Step 1: Install Dependencies**
```ruby theme={null}
npm install @cometchat/chat-uikit-react@6.2.3 @cometchat/calls-sdk-javascript
```
### **Step 2: Copy CometChat Folder**
Copy the `cometchat-app-react/src/CometChat` folder inside your `src/app` directory.
***
### **Step 3: Create & Initialize `CometChatNoSSR.tsx`**
Directory Structure:
```swift theme={null}
src/app/
├── CometChat/
└── CometChatNoSSR/
└── CometChatNoSSR.tsx
```
src/app/CometChatNoSSR/CometChatNoSSR.tsx
```javascript theme={null}
import React, { useEffect } from "react";
import {
CometChatUIKit,
UIKitSettingsBuilder,
} from "@cometchat/chat-uikit-react";
import CometChatApp from "../CometChat/CometChatApp";
import { CometChatProvider } from "../CometChat/context/CometChatContext";
import { setupLocalization } from "../CometChat/utils/utils";
export const COMETCHAT_CONSTANTS = {
APP_ID: "", // Replace with your App ID
REGION: "", // Replace with your App Region
AUTH_KEY: "", // Replace with your Auth Key or leave blank if you are authenticating using Auth Token
};
const CometChatNoSSR: React.FC = () => {
useEffect(() => {
const UIKitSettings = new UIKitSettingsBuilder()
.setAppId(COMETCHAT_CONSTANTS.APP_ID)
.setRegion(COMETCHAT_CONSTANTS.REGION)
.setAuthKey(COMETCHAT_CONSTANTS.AUTH_KEY)
.subscribePresenceForAllUsers()
.build();
CometChatUIKit.init(UIKitSettings)
?.then(() => {
setupLocalization();
console.log("Initialization completed successfully");
})
.catch((error) => console.error("Initialization failed", error));
}, []);
return (