> ## Documentation Index
> Fetch the complete documentation index at: https://cometchat-22654f5b-feature-react-native-sdk-quotedmessage-a.mintlify.site/llms.txt
> Use this file to discover all available pages before exploring further.
# Getting Started With UI Kit Builder
UI Kit Builder for React Native streamlines how you configure CometChat’s React Native UI Kit. Build themes, toggles, and layouts visually, export the settings JSON, and keep your production app synced by reading the same configuration at runtime.
 ## Complete Integration Workflow
1. Clone the React Native Builder sample.
2. Install dependencies (Node modules + CocoaPods) and add your CometChat credentials.
3. Run the sample on iOS/Android, scan/import a QR configuration, and validate the experience.
4. Copy the generated config store files into your own React Native app.
5. Wrap UI Kit components with the Builder-provided theme/settings.
6. Extend with fonts, persistence, and feature toggles as needed.
***
## Run the CometChat UIKit Builder Sample App
### 1. Download & Install
```bash theme={null}
git clone https://github.com/cometchat-team/uikit-builder-app-react-native.git
cd uikit-builder-app-react-native
npm install
```
### 2. iOS Dependencies
```bash theme={null}
cd ios
pod install
cd ..
```
### 3. Configure CometChat credentials
Edit `src/utils/AppConstants.tsx`:
```ts theme={null}
export const AppConstants = {
appId: 'YOUR_APP_ID',
authKey: 'YOUR_AUTH_KEY',
region: 'YOUR_REGION',
};
```
### 4. Run the Builder sample
```bash theme={null}
# Start Metro
npm start
# Launch iOS or Android
npm run ios
npm run android
```
With the sample running you can scan QR codes, import JSON, and preview Builder-generated layouts before you copy them into another project.
***
## Integrate Builder Configuration into Your React Native App
### 1. Install shared dependencies
```bash theme={null}
npm install zustand @react-native-async-storage/async-storage
```
### 2. Copy configuration files
From the sample project, copy:
* `src/config/store.ts` (Zustand store that manages Builder settings)
* `src/config/config.json` (default configuration template)
Place them inside `yourProject/src/config/`.
### 3. Wire the Builder theme into UI Kit
```tsx theme={null}
import React from 'react';
import { CometChatThemeProvider } from '@cometchat/chat-uikit-react-native';
import { useConfig } from './src/config/store';
const App = () => {
const styleConfig = useConfig((state) => state.settings.style);
const theme = {
light: {
color: {
primary: styleConfig.color.brandColor,
textPrimary: styleConfig.color.primaryTextLight,
textSecondary: styleConfig.color.secondaryTextLight,
},
},
dark: {
color: {
primary: styleConfig.color.brandColor,
textPrimary: styleConfig.color.primaryTextDark,
textSecondary: styleConfig.color.secondaryTextDark,
},
},
};
return (
{/* Existing app components */}
);
};
```
Use the Zustand store everywhere you need runtime access to Builder settings (feature toggles, layout preferences, or styling).
### 4. Respect feature toggles in UI Kit components
* Chat features (typing indicator, threads, mentions, reactions, etc.).
* Call features (1:1 voice, group video, lobby).
* Layout and discovery (tabs, sidebar, chat type).
These booleans live under `settings.chatFeatures`, `settings.callFeatures`, and `settings.layout` inside the Builder JSON, so you can decide which CometChat components to render or hide per experience.
***
## Project Structure Snapshot
```
src/
├── components/ # Conversations, calls, groups, users, login flows
├── config/ # Builder store + config.json
├── navigation/ # Stack/tab navigation
├── utils/ # App constants and helpers
└── assets/ # Icons, illustrations, fonts
```
Use the sample layout as a reference when organizing your own screens or when importing the Builder module as a feature flag playground.
***
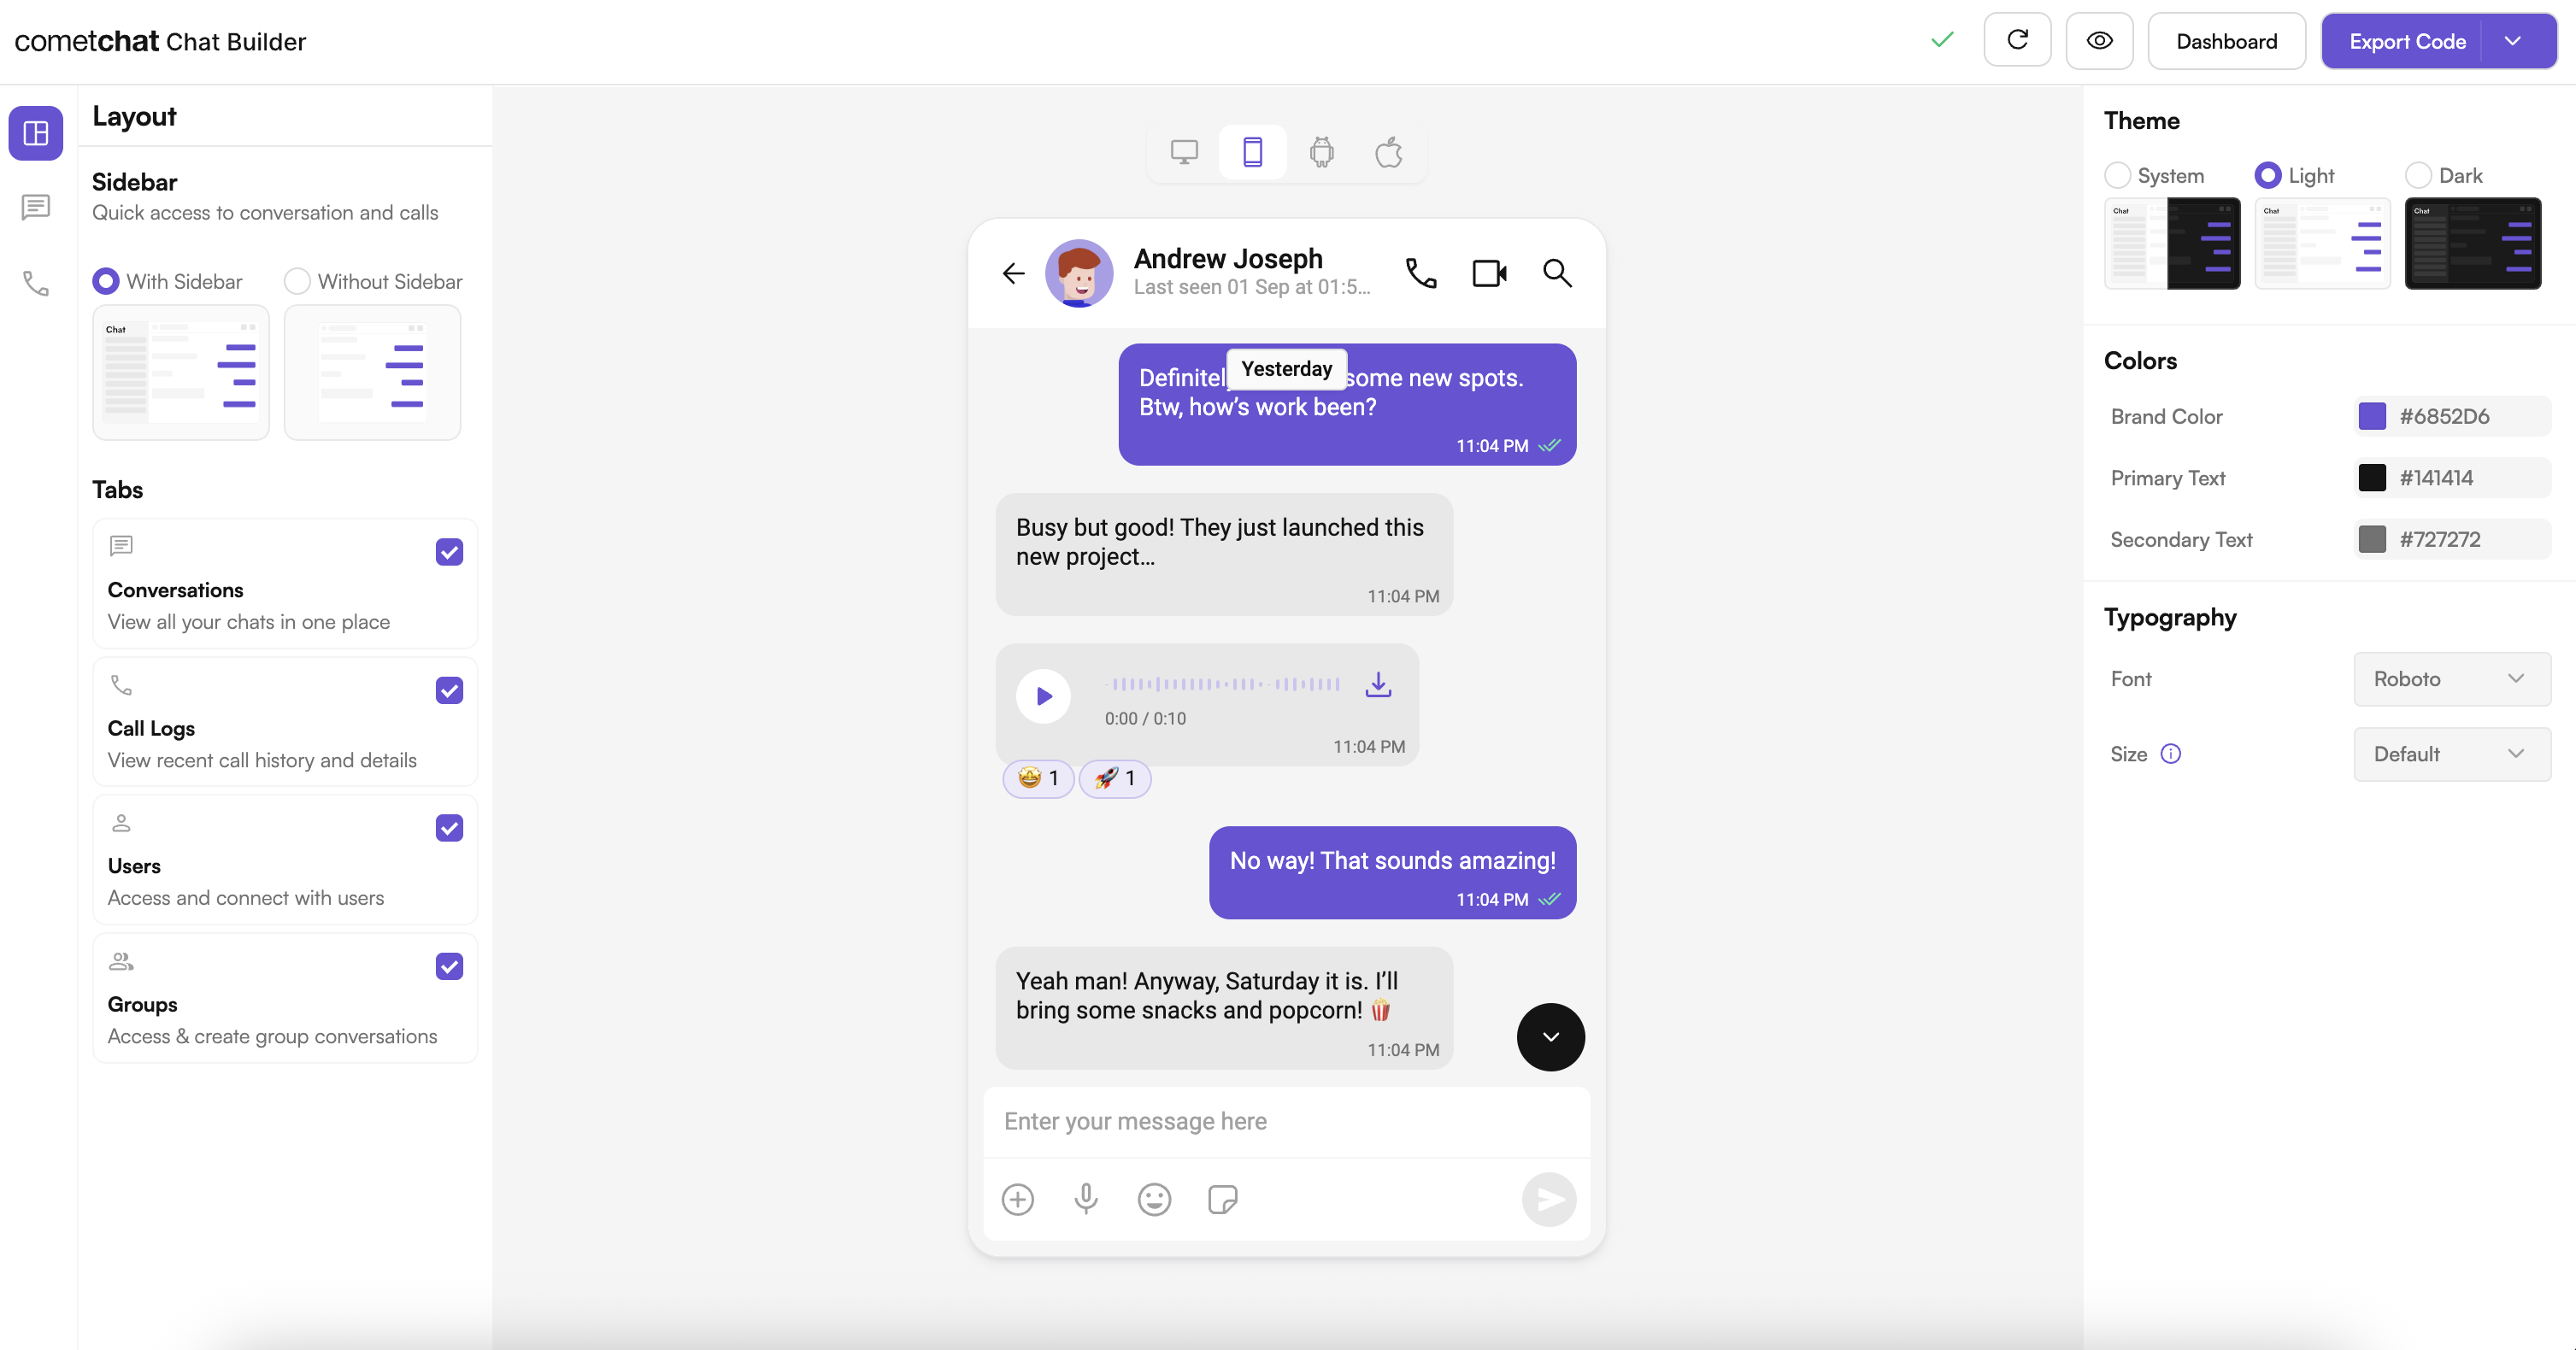
## Configuration Schema
Each QR code or exported JSON follows this structure:
```json theme={null}
{
"builderId": "unique-builder-id",
"settings": {
"chatFeatures": {
"coreMessagingExperience": {
"typingIndicator": true,
"threadConversationAndReplies": true
},
"deeperUserEngagement": {
"mentions": true,
"reactions": true
}
},
"callFeatures": {
"voiceAndVideoCalling": {
"oneOnOneVoiceCalling": true,
"groupVideoConference": true
}
},
"layout": {
"withSideBar": true,
"tabs": ["chats", "calls", "users", "groups"],
"chatType": "both"
},
"style": {
"theme": "system",
"color": {
"brandColor": "#6852D6",
"primaryTextLight": "#141414"
},
"typography": {
"font": "roboto",
"size": "default"
}
}
}
}
```
Persist this JSON locally (AsyncStorage, secure storage, or your backend) and hydrate the Zustand store at startup.
***
## Advanced Configuration
### Custom fonts
1. Add fonts to `ios//Resources/Fonts/` and `android/app/src/main/assets/fonts/`.
2. Map the font family in `App.tsx`:
```tsx theme={null}
const FONT_MAP = {
'your-custom-font': {
regular: Platform.OS === 'ios' ? 'YourFont-Regular' : 'your_font_regular',
medium: Platform.OS === 'ios' ? 'YourFont-Medium' : 'your_font_medium',
bold: Platform.OS === 'ios' ? 'YourFont-Bold' : 'your_font_bold',
},
};
```
### Persisting Builder settings manually
```ts theme={null}
import AsyncStorage from '@react-native-async-storage/async-storage';
import { useConfigStore } from './src/config/store';
export const saveConfig = async () => {
const config = useConfigStore.getState().config;
await AsyncStorage.setItem('@app_config', JSON.stringify(config));
};
export const loadConfig = async () => {
const savedConfig = await AsyncStorage.getItem('@app_config');
if (savedConfig) {
useConfigStore.getState().updateConfig(JSON.parse(savedConfig));
}
};
```
***
## Troubleshooting & Tips
* **Metro or Gradle errors**: ensure Node 18+, React Native 0.77+, and the correct Android/iOS toolchains are installed.
* **Plugin/config not loading**: verify `AppConstants.tsx` values and network connectivity when launching the Builder.
* **QR code parsing issues**: validate that the JSON matches the schema above; malformed objects will be ignored.
* **UI Kit mismatches**: confirm both the Builder sample and your production app use the same version of `@cometchat/chat-uikit-react-native`.
***
## Next Steps
* Theme deep dive: [Theme introduction](/ui-kit/react-native/theme-introduction)
* UI Kit components: [React Native UI Kit overview](/ui-kit/react-native/overview)
* Support ticket: [https://help.cometchat.com/hc/en-us/requests/new](https://help.cometchat.com/hc/en-us/requests/new)
* GitHub issues: [https://github.com/cometchat-team/uikit-builder-app-react-native/issues](https://github.com/cometchat-team/uikit-builder-app-react-native/issues)
## Complete Integration Workflow
1. Clone the React Native Builder sample.
2. Install dependencies (Node modules + CocoaPods) and add your CometChat credentials.
3. Run the sample on iOS/Android, scan/import a QR configuration, and validate the experience.
4. Copy the generated config store files into your own React Native app.
5. Wrap UI Kit components with the Builder-provided theme/settings.
6. Extend with fonts, persistence, and feature toggles as needed.
***
## Run the CometChat UIKit Builder Sample App
### 1. Download & Install
```bash theme={null}
git clone https://github.com/cometchat-team/uikit-builder-app-react-native.git
cd uikit-builder-app-react-native
npm install
```
### 2. iOS Dependencies
```bash theme={null}
cd ios
pod install
cd ..
```
### 3. Configure CometChat credentials
Edit `src/utils/AppConstants.tsx`:
```ts theme={null}
export const AppConstants = {
appId: 'YOUR_APP_ID',
authKey: 'YOUR_AUTH_KEY',
region: 'YOUR_REGION',
};
```
### 4. Run the Builder sample
```bash theme={null}
# Start Metro
npm start
# Launch iOS or Android
npm run ios
npm run android
```
With the sample running you can scan QR codes, import JSON, and preview Builder-generated layouts before you copy them into another project.
***
## Integrate Builder Configuration into Your React Native App
### 1. Install shared dependencies
```bash theme={null}
npm install zustand @react-native-async-storage/async-storage
```
### 2. Copy configuration files
From the sample project, copy:
* `src/config/store.ts` (Zustand store that manages Builder settings)
* `src/config/config.json` (default configuration template)
Place them inside `yourProject/src/config/`.
### 3. Wire the Builder theme into UI Kit
```tsx theme={null}
import React from 'react';
import { CometChatThemeProvider } from '@cometchat/chat-uikit-react-native';
import { useConfig } from './src/config/store';
const App = () => {
const styleConfig = useConfig((state) => state.settings.style);
const theme = {
light: {
color: {
primary: styleConfig.color.brandColor,
textPrimary: styleConfig.color.primaryTextLight,
textSecondary: styleConfig.color.secondaryTextLight,
},
},
dark: {
color: {
primary: styleConfig.color.brandColor,
textPrimary: styleConfig.color.primaryTextDark,
textSecondary: styleConfig.color.secondaryTextDark,
},
},
};
return (
{/* Existing app components */}
);
};
```
Use the Zustand store everywhere you need runtime access to Builder settings (feature toggles, layout preferences, or styling).
### 4. Respect feature toggles in UI Kit components
* Chat features (typing indicator, threads, mentions, reactions, etc.).
* Call features (1:1 voice, group video, lobby).
* Layout and discovery (tabs, sidebar, chat type).
These booleans live under `settings.chatFeatures`, `settings.callFeatures`, and `settings.layout` inside the Builder JSON, so you can decide which CometChat components to render or hide per experience.
***
## Project Structure Snapshot
```
src/
├── components/ # Conversations, calls, groups, users, login flows
├── config/ # Builder store + config.json
├── navigation/ # Stack/tab navigation
├── utils/ # App constants and helpers
└── assets/ # Icons, illustrations, fonts
```
Use the sample layout as a reference when organizing your own screens or when importing the Builder module as a feature flag playground.
***
## Configuration Schema
Each QR code or exported JSON follows this structure:
```json theme={null}
{
"builderId": "unique-builder-id",
"settings": {
"chatFeatures": {
"coreMessagingExperience": {
"typingIndicator": true,
"threadConversationAndReplies": true
},
"deeperUserEngagement": {
"mentions": true,
"reactions": true
}
},
"callFeatures": {
"voiceAndVideoCalling": {
"oneOnOneVoiceCalling": true,
"groupVideoConference": true
}
},
"layout": {
"withSideBar": true,
"tabs": ["chats", "calls", "users", "groups"],
"chatType": "both"
},
"style": {
"theme": "system",
"color": {
"brandColor": "#6852D6",
"primaryTextLight": "#141414"
},
"typography": {
"font": "roboto",
"size": "default"
}
}
}
}
```
Persist this JSON locally (AsyncStorage, secure storage, or your backend) and hydrate the Zustand store at startup.
***
## Advanced Configuration
### Custom fonts
1. Add fonts to `ios//Resources/Fonts/` and `android/app/src/main/assets/fonts/`.
2. Map the font family in `App.tsx`:
```tsx theme={null}
const FONT_MAP = {
'your-custom-font': {
regular: Platform.OS === 'ios' ? 'YourFont-Regular' : 'your_font_regular',
medium: Platform.OS === 'ios' ? 'YourFont-Medium' : 'your_font_medium',
bold: Platform.OS === 'ios' ? 'YourFont-Bold' : 'your_font_bold',
},
};
```
### Persisting Builder settings manually
```ts theme={null}
import AsyncStorage from '@react-native-async-storage/async-storage';
import { useConfigStore } from './src/config/store';
export const saveConfig = async () => {
const config = useConfigStore.getState().config;
await AsyncStorage.setItem('@app_config', JSON.stringify(config));
};
export const loadConfig = async () => {
const savedConfig = await AsyncStorage.getItem('@app_config');
if (savedConfig) {
useConfigStore.getState().updateConfig(JSON.parse(savedConfig));
}
};
```
***
## Troubleshooting & Tips
* **Metro or Gradle errors**: ensure Node 18+, React Native 0.77+, and the correct Android/iOS toolchains are installed.
* **Plugin/config not loading**: verify `AppConstants.tsx` values and network connectivity when launching the Builder.
* **QR code parsing issues**: validate that the JSON matches the schema above; malformed objects will be ignored.
* **UI Kit mismatches**: confirm both the Builder sample and your production app use the same version of `@cometchat/chat-uikit-react-native`.
***
## Next Steps
* Theme deep dive: [Theme introduction](/ui-kit/react-native/theme-introduction)
* UI Kit components: [React Native UI Kit overview](/ui-kit/react-native/overview)
* Support ticket: [https://help.cometchat.com/hc/en-us/requests/new](https://help.cometchat.com/hc/en-us/requests/new)
* GitHub issues: [https://github.com/cometchat-team/uikit-builder-app-react-native/issues](https://github.com/cometchat-team/uikit-builder-app-react-native/issues)