> ## Documentation Index
> Fetch the complete documentation index at: https://cometchat-22654f5b-feature-react-native-sdk-quotedmessage-a.mintlify.site/llms.txt
> Use this file to discover all available pages before exploring further.
# Getting Started With CometChat Flutter UI Kit
CometChat UI Kit for Flutter is a package of pre-assembled UI elements crafted to streamline the creation of an in-app chat equipped with essential messaging functionalities. Our UI Kit presents options for light and dark themes, diverse fonts, colors, and extra customization capabilities.
CometChat UI Kit supports both one-to-one and group conversations. Follow the guide below to initiate conversations from scratch using CometChat Flutter UI Kit.
## Prerequisites
Before installing the **UI Kit**, you need to create a CometChat application on the CometChat Dashboard, which includes all the necessary data for a chat service, such as users, groups, calls, and messages. You will require the `App ID`, `AuthKey`, and `Region` of your CometChat application when initializing the SDK.
**i. Register on CometChat**
* You need to register on the **CometChat Dashboard** first. [Click here to sign up](https://app.cometchat.com/login).
**ii. Get Your Application Keys**
* Create a **new app**
* Head over to the **QuickStart** or **API & Auth Keys section** and note the **App ID**, **Auth Key**, and **Region**.
> Each CometChat application can be integrated with a single client app. Within the same application, users can communicate with each other across all platforms, whether they are on mobile devices or on the web.
**iii. Platform & IDE Setup**
* Flutter installed on your system.
* Android Studio or VS Code with configured Flutter/Dart plugins.
* Xcode & Pod (CocoaPods) for iOS
* An iOS device or emulator with iOS 12.0 or above.
* Android device or emulator with Android version 5.0 or above.
## Getting Started
### **Step 1: Create Flutter application project**
To get started, create a new flutter application project.
***
### **Step 2: Add Dependency**
**1. Update Pubspec**
To use this UI Kit in your Flutter project, you'll need to add the following dependency to the dependencies section of your `pubspec.yaml` file:
```yaml pubspec.yaml theme={null}
cometchat_chat_uikit: ^5.2.4
cometchat_calls_uikit: ^5.0.10 #Optional: Include if you're using Audio/Video Calling
```
Final `pubspec.yaml`
```yaml pubspec.yaml theme={null}
name: getting_started
description: "A new Flutter project."
publish_to: 'none' # Remove this line if you wish to publish to pub.dev
version: 1.0.0+1
environment:
sdk: ^3.5.3
dependencies:
flutter:
sdk: flutter
cometchat_chat_uikit: ^5.2.4
cometchat_calls_uikit: ^5.0.10 #Optional: Include if you're using Audio/Video Calling
cupertino_icons: ^1.0.8
dev_dependencies:
flutter_test:
sdk: flutter
flutter_lints: ^4.0.0
flutter:
uses-material-design: true
```
***
**2. Android App Setup**
To ensure compatibility with the CometChat Calling UI Kit and its dependencies, your Flutter project must target a minimum SDK version of **24 or higher**.\
Update the `minSdkVersion` in your Android project configuration, located at `android/app/build.gradle`:
```gradle build.gradle theme={null}
android {
defaultConfig {
minSdk = 24
// Other configurations...
}
}
```
***
**3. Update iOS Podfile**
In your Podfile (located at ios/Podfile), update the minimum iOS version your project supports to 12.0:
```ruby Podfile theme={null}
platform :ios, '12.0'
```
***
4. Import CometChat UIKit In your Dart code, import the CometChat UIKit package to access its features. Add the following import statement to your main.dart file:
```dart main.dart theme={null}
import 'package:cometchat_chat_uikit/cometchat_chat_uikit.dart';
import 'package:cometchat_calls_uikit/cometchat_calls_uikit.dart'; //Optional: Include if you're using Audio/Video Calling
```
***
### **Step 3: Initialize UI Kit**
Before using any features from the CometChat UI Kit, initialize it with your app credentials.
1. **Import & Configure UIKit Settings** You can store your app credentials (App ID, Auth Key, Region) in a dedicated configuration file and load them dynamically in your app.
**Example Configuration File:**
```dart cometchat_config.dart theme={null}
class CometChatConfig {
static const String appId = "APP_ID"; // Replace with your App ID
static const String region = "REGION"; // Replace with your App Region
static const String authKey = "AUTH_KEY"; // Replace with your Auth Key
}
```
**Initialization Code:**
```dart main.dart theme={null}
import 'cometchat_config.dart';
UIKitSettings uiKitSettings = (UIKitSettingsBuilder()
..subscriptionType = CometChatSubscriptionType.allUsers
..autoEstablishSocketConnection = true
..region = CometChatConfig.region
..appId = CometChatConfig.appId
..authKey = CometChatConfig.authKey
..extensions = CometChatUIKitChatExtensions.getDefaultExtensions() //Replace this with empty array, if you want to disable all extensions
..callingExtension = CometChatCallingExtension(); //Optional: Include if you're using Audio/Video Calling
).build();
CometChatUIKit.init(
uiKitSettings: uiKitSettings,
onSuccess: (successMessage) async {
debugPrint('CometChat Initialized');
// You can now log in the user
},
onError: (error) {
debugPrint('CometChat Initialization error');
},
);
```
> Store your CometChat credentials in a config file to simplify environment management and avoid hardcoding.
***
### **Step 4: Login to UI Kit**
Once the UI Kit is initialized, authenticate your user using the `login()` method. You’ll receive a `User` object upon success.
```dart main.dart theme={null}
CometChatUIKit.login(
"cometchat-uid-1", // Replace with a valid UID
onSuccess: (user) {
debugPrint('CometChat LoggedIn success');
},
onError: (error) {
debugPrint('CometChat LoggedIn error');
},
);
```
You can test using any of the following pre-generated users:
* `cometchat-uid-1`
* `cometchat-uid-2`
* `cometchat-uid-3`
* `cometchat-uid-4`
* `cometchat-uid-5`
> For more information, refer to the documentation on [Init](/ui-kit/flutter/methods#init) and [Login](/ui-kit/flutter/methods#login-using-auth-key).
#### **Example: Initialization and Login Combined**
```dart main.dart theme={null}
import 'cometchat_config.dart';
void main() {
UIKitSettings uiKitSettings = (UIKitSettingsBuilder()
..subscriptionType = CometChatSubscriptionType.allUsers
..autoEstablishSocketConnection = true
..region = CometChatConfig.region
..appId = CometChatConfig.appId
..authKey = CometChatConfig.authKey
..extensions = CometChatUIKitChatExtensions.getDefaultExtensions() //Replace this with empty array, if you want to disable all extensions
..callingExtension = CometChatCallingExtension(); //Optional: Include if you're using Audio/Video Calling
).build();
CometChatUIKit.init(
uiKitSettings: uiKitSettings,
onSuccess: (successMessage) async {
debugPrint('CometChat Initialized');
CometChatUIKit.login(
"cometchat-uid-1",
onSuccess: (user) {
debugPrint('CometChat LoggedIn success');
},
onError: (error) {
debugPrint('CometChat LoggedIn error');
},
);
},
onError: (error) {
debugPrint('CometChat Initialization error');
},
);
}
```
> Extract credentials into a separate file (`cometchat_config.dart`) for better maintainability.
***
### **Step 5: Choose a Chat Experience**
Integrate a conversation view that suits your application's **UX requirements**. Below are the available options:
***
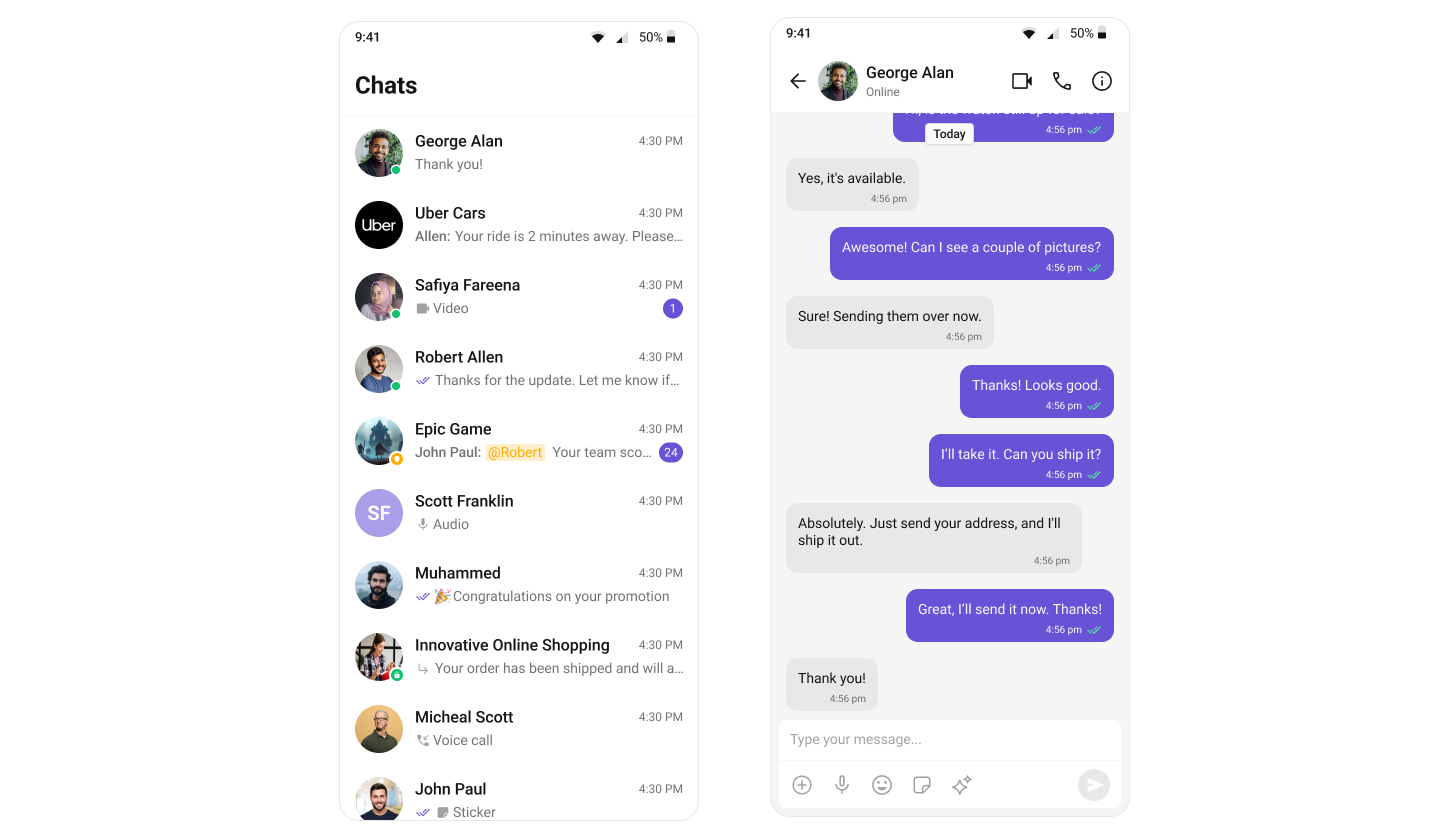
### **1️⃣ Conversation List + Message View**
**Best for:** Flutter apps that need a **smooth, stack-based navigation** between conversations and messages.
**Highlights:**
* **Compact Layout** – Uses `Navigator.push()` for mobile-first navigation.
* **One-to-One & Group Chats** – Built-in support for private and group conversations.
* **Real-Time Messaging** – Message list and view auto-refresh with CometChat events.
* **State Persistence** – Session-aware updates across screens and app restarts.
* **Mobile-First UI** – Optimized widgets that adapt to different screen sizes.
* **Extremely Customizable** – Modify styles, themes, and components easily.
**Use When:**
* You want a **clean navigation experience** for multiple chat sessions.
* Your Flutter app supports **both direct and group messaging**.
* You prefer a **stack-based routing approach** using `Navigator`.
[Integrate Conversation List + Message View](./flutter-conversation)
***
### **2️⃣ One-to-One / Group Chat**
**Best for:** When a user lands **directly into a chat screen**, bypassing the conversation list.
**Highlights:**
* **Single Screen Chat** – Use `CometChatMessages` widget with preselected user/group.
* **No Conversation List** – Start with just the message screen.
* **Ideal for support & contextual chat** – Ticket-based or user-to-agent communication.
* **Simplified Routing** – Pass user/group as route argument.
* **Real-Time Communication** – Auto-updates messages and statuses.
**Use When:**
* Your chat starts **from a specific user or group ID**.
* You want a **clean, focused chat interface**.
* Use case involves **support, onboarding, or one-time messages**.
[Integrate One-to-One / Group Chat](./flutter-one-to-one-chat)
***
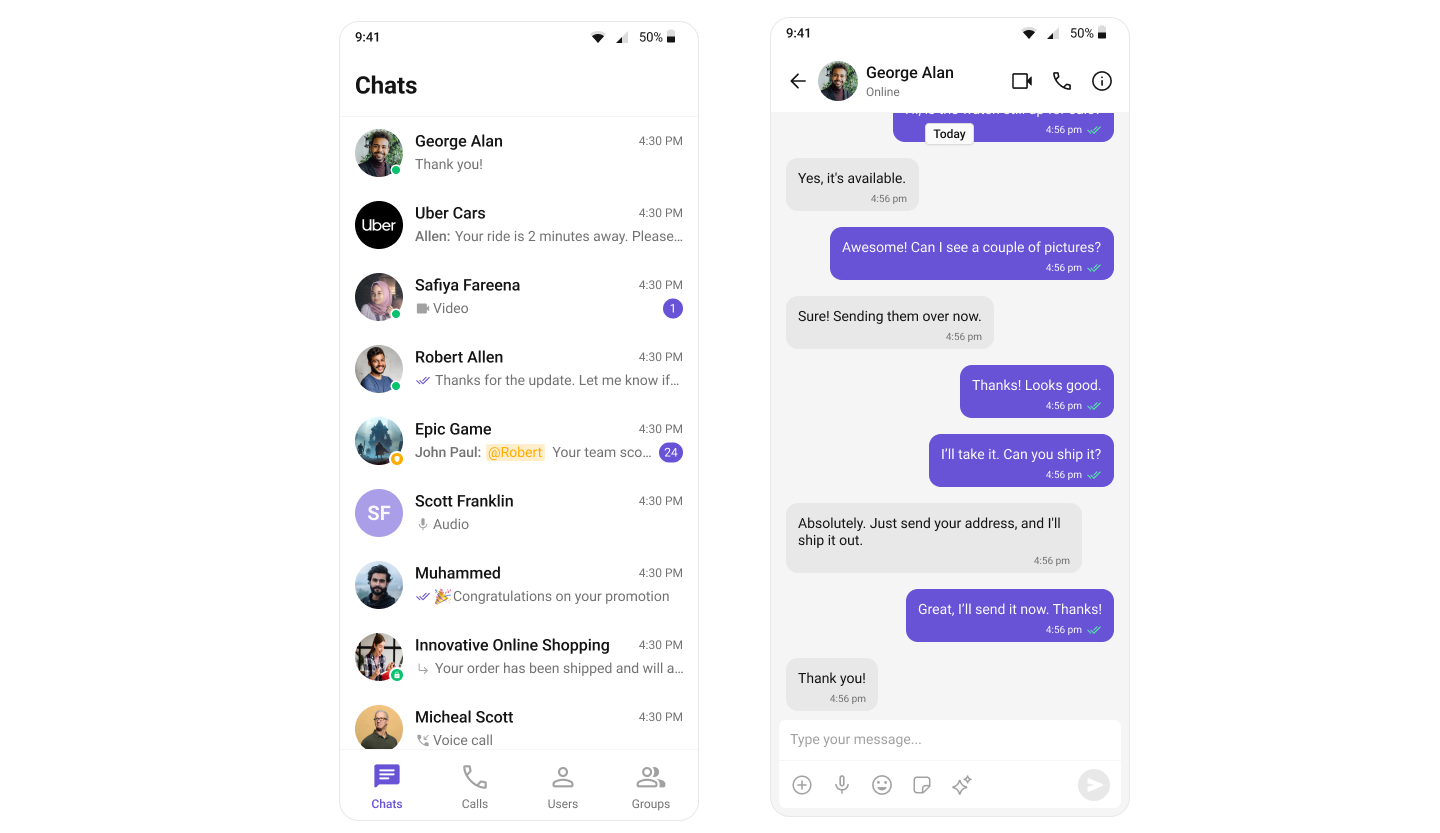
### **3️⃣ Tab-Based Messaging UI (All-in-One)**
**Best for:** Flutter apps needing a **multi-tab experience** to access Chat, Users, Calls, and Settings.
**Highlights:**
* **Tab Navigation** – Use `BottomNavigationBar` to switch between core features.
* **Independent Screens** – Chats, Calls, Users, and Settings in dedicated widgets.
* **No Sidebar** – True mobile layout using bottom tabs, ideal for smaller devices.
* **Scalable** – Add new tabs like Profile, Notifications, or Help later.
* **Seamless UX** – Syncs chat state across tabs with minimal boilerplate.
**Use When:**
* You need a **full-featured chat solution** in one UI.
* Your users require **structured navigation** between modules.
* Use cases like **support apps, business messengers, or social platforms**.
[Integrate Tab-Based Chat](./flutter-tab-based-chat)
***
## **Build Your Own Chat Experience**
**Best for:** Developers who need complete control over their chat interface, allowing customization of components, themes, and features to align with their app’s design and functionality. Whether you're enhancing an existing chat experience or building from scratch, this approach provides the flexibility to tailor every aspect to your needs.
**Recommended for:**
* Apps that require **a fully customized chat experience**.
* Developers who want to **extend functionalities and modify UI components**.
* Businesses integrating chat seamlessly into **existing platforms**.
**Key Areas to Explore:**
* **[Flutter Sample App](https://github.com/cometchat/cometchat-uikit-flutter/tree/v5/sample_app)** – Fully functional sample applications to accelerate your development.
* **[Core Features](./core-features)** – Learn about messaging, real-time updates, and other essential capabilities.
* **[Components](./components-overview)** – Utilize prebuilt UI elements or customize them to fit your design.
* **[Themes](./theme-introduction)** – Adjust colors, fonts, and styles to match your branding.
* **[Build Your Own UI](/sdk/flutter/overview)** – Prefer a custom UI over our UI Kits? Explore our SDKs to create a tailored chat experience.
***
## **Next Steps**
Now that you’ve selected your **chat experience**, proceed to the **integration guide**:
* **[Integrate Conversation List + Message](/ui-kit/flutter/flutter-conversation)**
* **[Integrate One-to-One Chat](/ui-kit/flutter/flutter-one-to-one-chat)**
* **[Integrate Tab-Based Chat](/ui-kit/flutter/flutter-tab-based-chat)**
* **[Advanced Customizations](/ui-kit/flutter/theme-introduction)**
***
 **Use When:**
* You want a **clean navigation experience** for multiple chat sessions.
* Your Flutter app supports **both direct and group messaging**.
* You prefer a **stack-based routing approach** using `Navigator`.
[Integrate Conversation List + Message View](./flutter-conversation)
***
### **2️⃣ One-to-One / Group Chat**
**Best for:** When a user lands **directly into a chat screen**, bypassing the conversation list.
**Highlights:**
* **Single Screen Chat** – Use `CometChatMessages` widget with preselected user/group.
* **No Conversation List** – Start with just the message screen.
* **Ideal for support & contextual chat** – Ticket-based or user-to-agent communication.
* **Simplified Routing** – Pass user/group as route argument.
* **Real-Time Communication** – Auto-updates messages and statuses.
**Use When:**
* You want a **clean navigation experience** for multiple chat sessions.
* Your Flutter app supports **both direct and group messaging**.
* You prefer a **stack-based routing approach** using `Navigator`.
[Integrate Conversation List + Message View](./flutter-conversation)
***
### **2️⃣ One-to-One / Group Chat**
**Best for:** When a user lands **directly into a chat screen**, bypassing the conversation list.
**Highlights:**
* **Single Screen Chat** – Use `CometChatMessages` widget with preselected user/group.
* **No Conversation List** – Start with just the message screen.
* **Ideal for support & contextual chat** – Ticket-based or user-to-agent communication.
* **Simplified Routing** – Pass user/group as route argument.
* **Real-Time Communication** – Auto-updates messages and statuses.
 **Use When:**
* Your chat starts **from a specific user or group ID**.
* You want a **clean, focused chat interface**.
* Use case involves **support, onboarding, or one-time messages**.
[Integrate One-to-One / Group Chat](./flutter-one-to-one-chat)
***
### **3️⃣ Tab-Based Messaging UI (All-in-One)**
**Best for:** Flutter apps needing a **multi-tab experience** to access Chat, Users, Calls, and Settings.
**Highlights:**
* **Tab Navigation** – Use `BottomNavigationBar` to switch between core features.
* **Independent Screens** – Chats, Calls, Users, and Settings in dedicated widgets.
* **No Sidebar** – True mobile layout using bottom tabs, ideal for smaller devices.
* **Scalable** – Add new tabs like Profile, Notifications, or Help later.
* **Seamless UX** – Syncs chat state across tabs with minimal boilerplate.
**Use When:**
* Your chat starts **from a specific user or group ID**.
* You want a **clean, focused chat interface**.
* Use case involves **support, onboarding, or one-time messages**.
[Integrate One-to-One / Group Chat](./flutter-one-to-one-chat)
***
### **3️⃣ Tab-Based Messaging UI (All-in-One)**
**Best for:** Flutter apps needing a **multi-tab experience** to access Chat, Users, Calls, and Settings.
**Highlights:**
* **Tab Navigation** – Use `BottomNavigationBar` to switch between core features.
* **Independent Screens** – Chats, Calls, Users, and Settings in dedicated widgets.
* **No Sidebar** – True mobile layout using bottom tabs, ideal for smaller devices.
* **Scalable** – Add new tabs like Profile, Notifications, or Help later.
* **Seamless UX** – Syncs chat state across tabs with minimal boilerplate.
 **Use When:**
* You need a **full-featured chat solution** in one UI.
* Your users require **structured navigation** between modules.
* Use cases like **support apps, business messengers, or social platforms**.
[Integrate Tab-Based Chat](./flutter-tab-based-chat)
***
## **Build Your Own Chat Experience**
**Best for:** Developers who need complete control over their chat interface, allowing customization of components, themes, and features to align with their app’s design and functionality. Whether you're enhancing an existing chat experience or building from scratch, this approach provides the flexibility to tailor every aspect to your needs.
**Recommended for:**
* Apps that require **a fully customized chat experience**.
* Developers who want to **extend functionalities and modify UI components**.
* Businesses integrating chat seamlessly into **existing platforms**.
**Key Areas to Explore:**
* **[Flutter Sample App](https://github.com/cometchat/cometchat-uikit-flutter/tree/v5/sample_app)** – Fully functional sample applications to accelerate your development.
* **[Core Features](./core-features)** – Learn about messaging, real-time updates, and other essential capabilities.
* **[Components](./components-overview)** – Utilize prebuilt UI elements or customize them to fit your design.
* **[Themes](./theme-introduction)** – Adjust colors, fonts, and styles to match your branding.
* **[Build Your Own UI](/sdk/flutter/overview)** – Prefer a custom UI over our UI Kits? Explore our SDKs to create a tailored chat experience.
***
## **Next Steps**
Now that you’ve selected your **chat experience**, proceed to the **integration guide**:
* **[Integrate Conversation List + Message](/ui-kit/flutter/flutter-conversation)**
* **[Integrate One-to-One Chat](/ui-kit/flutter/flutter-one-to-one-chat)**
* **[Integrate Tab-Based Chat](/ui-kit/flutter/flutter-tab-based-chat)**
* **[Advanced Customizations](/ui-kit/flutter/theme-introduction)**
***
**Use When:**
* You need a **full-featured chat solution** in one UI.
* Your users require **structured navigation** between modules.
* Use cases like **support apps, business messengers, or social platforms**.
[Integrate Tab-Based Chat](./flutter-tab-based-chat)
***
## **Build Your Own Chat Experience**
**Best for:** Developers who need complete control over their chat interface, allowing customization of components, themes, and features to align with their app’s design and functionality. Whether you're enhancing an existing chat experience or building from scratch, this approach provides the flexibility to tailor every aspect to your needs.
**Recommended for:**
* Apps that require **a fully customized chat experience**.
* Developers who want to **extend functionalities and modify UI components**.
* Businesses integrating chat seamlessly into **existing platforms**.
**Key Areas to Explore:**
* **[Flutter Sample App](https://github.com/cometchat/cometchat-uikit-flutter/tree/v5/sample_app)** – Fully functional sample applications to accelerate your development.
* **[Core Features](./core-features)** – Learn about messaging, real-time updates, and other essential capabilities.
* **[Components](./components-overview)** – Utilize prebuilt UI elements or customize them to fit your design.
* **[Themes](./theme-introduction)** – Adjust colors, fonts, and styles to match your branding.
* **[Build Your Own UI](/sdk/flutter/overview)** – Prefer a custom UI over our UI Kits? Explore our SDKs to create a tailored chat experience.
***
## **Next Steps**
Now that you’ve selected your **chat experience**, proceed to the **integration guide**:
* **[Integrate Conversation List + Message](/ui-kit/flutter/flutter-conversation)**
* **[Integrate One-to-One Chat](/ui-kit/flutter/flutter-one-to-one-chat)**
* **[Integrate Tab-Based Chat](/ui-kit/flutter/flutter-tab-based-chat)**
* **[Advanced Customizations](/ui-kit/flutter/theme-introduction)**
***